技術資料 トップチェーン 取扱
トップチェーンの取扱
3-1. チェーンの分解・連結
3-1-1. 継手ピンがDピンタイプ(TPUN555形除く)
チェーンのどの部分からでも、分解できます。また、ピンは、左右どちらからでも抜差しできます。
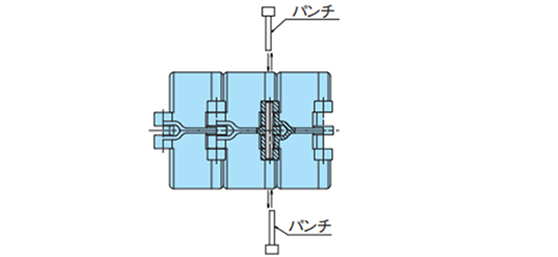
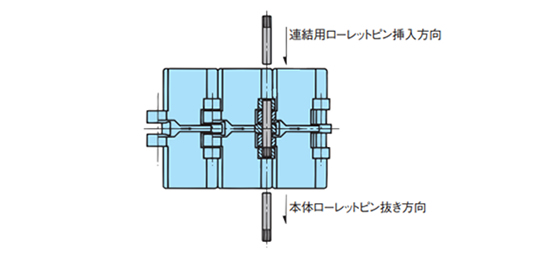
3-1-2. 継手ピンがローレットピンタイプ
分解時はローレット加工していない側の端部にパンチを当てて抜いてください。再度連結する場合はローレット加工している側の端部にパンチを当てて連結してください。
(TTPDH形、TTPDH-LBP形のみローレット側は再連結しても同一方向になります。)
3-1-3. TTUPM838H形
継手ピンがDピンタイプのため、左右どちらからでも抜き差し出来ます。なお、外径Φ6~7.5のパンチをご使用ください。
挿入不足、挿入しすぎにはご注意ください。
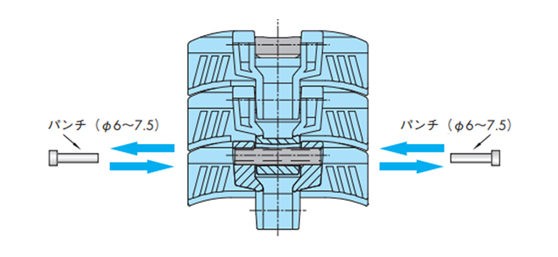
外径Φ6以下、Φ7.5以上のパンチを使用するとチェーンおよびピンが損傷します。
3-1-4. TN/TNU/TRU/TP-PT/TP-PTS/TP-1873T
ジョイント部のピンと外プレートの片側とはルーズフィットとなっています。
ジョイント部以外のところで分解する場合は、チェーンバイスなどを用いて、一対のピンを平行に抜いてください。
なお、ジョイント部以外で分解したリンクは再使用できません。
3-1-5. TP-1843G形/TP-1873G形
ジョイント用のトッププレートは茶色と白色を各1個ずつ付属しています。ジョイント部判別用として白色のトッププレートをご使用いただけます。
ジョイント部のピンと外プレートの片側とはルーズフィットとなっています。
ジョイント部以外のところで分解する場合は、チェーンバイスなどを用いて、一対のピンを平行に抜いてください。
なお、ジョイント部以外で分解したリンクは再使用できません。
3-1-6. ST/RT形
ピンとプレートは、すべてルーズフィットで、チェーンのどの部分からでも分解できます。また、ピンは、左右どちらからでも抜差しできます。
3-1-7. TO/TU形
トッププレートの反対側よりピンを抜いてください。
3-1-8. TS形
チェーンのどの部分からでも分解できます。割ピン側よりピンを抜いてください。
3-1-9. TTKU形
ジョイント部のピンと外プレートの片側とはルーズフィットとなっています。
ジョイント部以外のところで分解する場合は、ピンを締鋲していますので、グラインダでピンの端部を削り、一対のピンを平行に抜いてください。
なお、ジョイント部以外で分解したリンクは再使用できません。
3-1-10. TPUN555形
ピン挿入方向は一方方向です。挿入方向と反対側のピン端面にパンチを当てて、抜いてください。
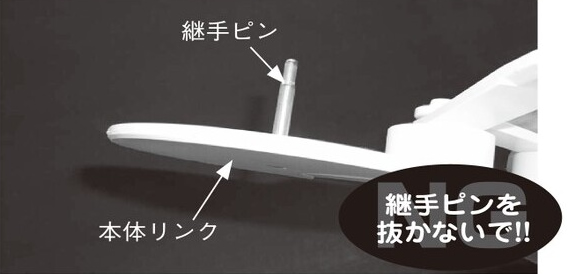
3-1-11. プラクレセント®
1. 継手ピンからスナップピンを抜き、オフセットリンクを外してください。

2. オフセットリンクを90度回転させてください。
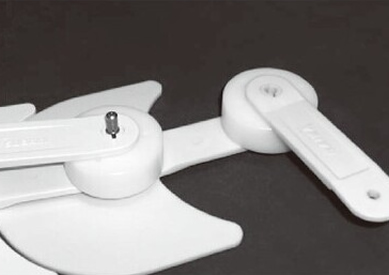
3. 継手ピンを本体リンクごと前のリンクから抜き取ってください。
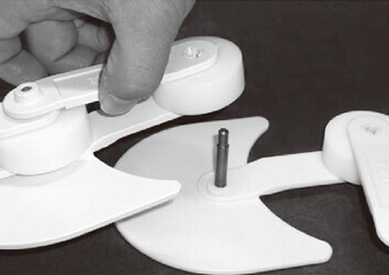
注)分解の際、継手ピンを本体リンクから抜かないでください。
3-2. プラピンタイプの使用上の留意点と分解・連結
| 対象商品 | TTP-P形・TTPH-P形・TPS-P形・TPH-P形・TPM-P-SN形・TTUP-P形・TTUPM-P形・TTUPM-PC形・TPU-P形・TTUPM838H形・TPUSR-P形・TP-UB36P形・RSP40P形・RSP60P形・RSP60P-CU形 |
|---|
- 1. スロースタート・スロー停止を行ってください。
- 2. チェーンに初期張力を与えないでください。
- 3. チェーンの切継ぎは、エンプラ製ピンを使用していますので、一度抜いたピンを再使用しますとはめあい力が低下し、ピン抜けトラブルの原因になります。
必ず下記要領にしたがってチェーンの切継ぎを行ってください。 - 4. プラスチックモジュラーチェーンは各々選定の項に記載しています。
- 5. エンプラ製ピンを使用したチェーンは、ウェット条件では60℃を超える温度で使用しないでください。
連結用Dピン
- 1)連結時は、付属した専用のDピン(本体ピン:白色、継手ピン:オレンジ色)をご使用ください。
- 2)継手ピンは本体Dピン(白色)と識別するため、オレンジ色としています。
- 3)継手Dピンはチェーン1本につき1本付属しています。
切継要領
(1) 分解時
- 1)Dピンの端面にリンクのピン穴より少し細い外径のパンチを当てて、軽くハンマで叩いてピンを抜きます。抜き方向は左右どちらでも可能です。
- 2)一度抜いたDピンは再使用しないでください。
(2) 連結時
- 1)専用の継手Dピン(オレンジ色)をご使用ください。
- 2)Dピン端面にパンチを当てて、軽くハンマで叩きDピンをリンクのピン穴に挿入します。
挿入方向は左右どちらからでも可能です。既に挿入されている継手ピン(オレンジ色)の箇所では切り継ぎしないでください。 - 3)連結したDピンがヒンジ端面から左右均等な沈込み量で挿入されているか確認してください。
- 4)連結したチェーンの屈曲がスムーズに行われているかを確認してください。
