技術資料 高速リフタ リフトマスタ 取扱
荷受・運搬・設置
ここでは、リフトマスタ®に関する一般的な取扱いについて記載しています。
詳細につきましては、製品に同梱しています取扱説明書をご参照ください。
荷受時の点検
リフトマスタがお手元にとどきましたら、次の項目を確認ください。
もし不具合箇所や疑問点がありましたらお買い上げの店へご連絡ください。
- ・銘板に記載されている[1] TYPE(形番)、[2] MFG NO.(製造番号)、[3] DRAWING NO.(図面番号)がご要望のものと一致しているかどうか(図1)
- ・輸送のため破損した箇所がないか
- ・ネジやナットが緩んでいないか
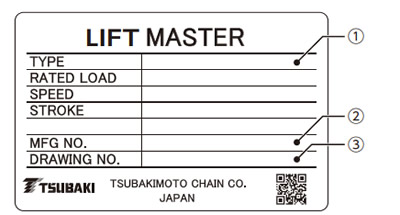
(図1)銘板の見方
お問合せの場合は、[1]TYPE(形番)、[2]MFG NO.(製造番号)、[3]DRAWING NO.(図面番号)をご連絡ください。
据付
1. 据付時の注意事項
| ⚠ 警告 |
|
|---|
2. 据付手順
(1) 予め取付面の剛性が十分か、水準器で水平となっているかご確認ください。
※取付面側の水平出しを確実に行っていただけますと、リフトマスタの立ち精度出しが容易となります。
| ⚠ 警告 |
|
|---|
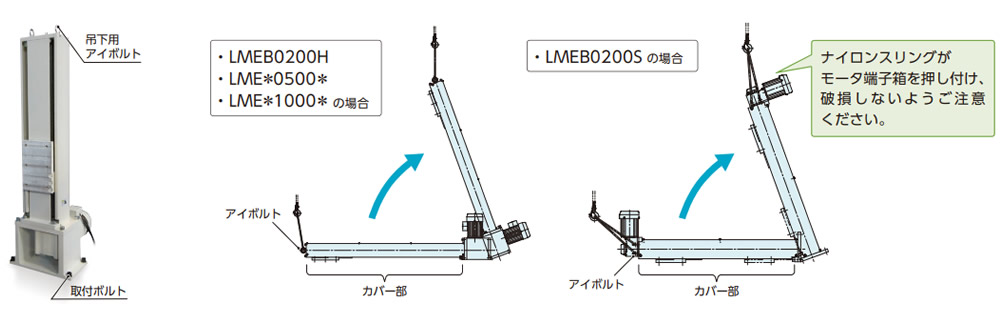
(2) 本体を吊上げる際には、まず梱包箱をバラして本体上部のアイボルトにナイロンスリング等の吊り具を掛けて、本体を起立させてください。
そのまま起立させた状態で本体を吊り上げ、据付け位置まで移動させます。
※本体を吊上げる際には、納品図により質量を確認し、適正な吊り具を使用してください。
※下図は参考図です。実際の外形は納品図を参照ください。
| ⚠ 警告 |
|
|---|
(3) ボルトM16×4ヵ所(強度区分10.9以上)にてリフタ本体を仮固定します。
*取付ボルトは貴社にてご準備ください。
| ⚠ 警告 |
|
|---|
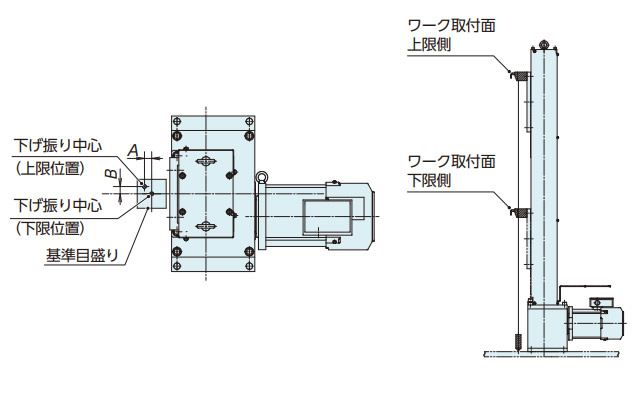
(4) 必要に応じてレベル調整を行ってください。
※リフトマスタの立ち精度の確認は、右図のように下げ振り等を用いて確認ください。
(A,B寸法の誤差がリフトマスタ上下限で、±1mm(目安)以内となるように調整を行ってください)
(5) レベル調整後、取付ボルトを締付けてください。(推奨締付トルク 289N・m)
(6) 取付ボルトの締付状態に問題が無いことを確認してから試運転を実施してください。
[下げ振りイメージ図]